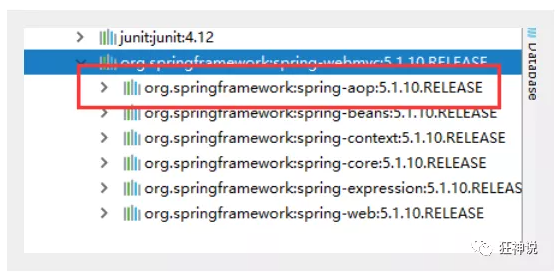
使用注解开发
说明
在spring4之后,想要使用注解形式,必须得要引入aop的包

在配置文件当中,还得要引入一个context约束
<?xml version="1.0" encoding="UTF-8"?>
<beans xmlns="http://www.springframework.org/schema/beans"
      xmlns:xsi="http://www.w3.org/2001/XMLSchema-instance"
      xmlns:context="http://www.springframework.org/schema/context"
      xsi:schemaLocation="http://www.springframework.org/schema/beans
       http://www.springframework.org/schema/beans/spring-beans.xsd
       http://www.springframework.org/schema/context
       http://www.springframework.org/schema/context/spring-context.xsd">

</beans>
Bean的实现
我们之前都是使用 bean 的标签进行bean注入,但是实际开发中,我们一般都会使用注解!
1、配置扫描哪些包下的注解
<!--指定注解扫描包-->
<context:component-scan base-package="com.kuang.pojo"/>
2、在指定包下编写类,增加注解
@Component("user")
// 相当于配置文件中 <bean id="user" class="当前注解的类"/>
public class User {
   public String name = "秦疆";
}
3、测试
@Test
public void test(){
   ApplicationContext applicationContext =
       new ClassPathXmlApplicationContext("beans.xml");
   User user = (User) applicationContext.getBean("user");
   System.out.println(user.name);
}
属性注入
使用注解注入属性
1、可以不用提供set方法,直接在直接名上添加@value("值")
@Component("user")
// 相当于配置文件中 <bean id="user" class="当前注解的类"/>
public class User {
   @Value("秦疆")
   // 相当于配置文件中 <property name="name" value="秦疆"/>
   public String name;
}
2、如果提供了set方法,在set方法上添加@value("值");
@Component("user")
public class User {

   public String name;

   @Value("秦疆")
   public void setName(String name) {
       this.name = name;
  }
}
衍生注解
我们这些注解,就是替代了在配置文件当中配置步骤而已!更加的方便快捷!
@Component三个衍生注解
为了更好的进行分层,Spring可以使用其它三个注解,功能一样,目前使用哪一个功能都一样。
- @Controller:web层
- @Service:service层
- @Repository:dao层
写上这些注解,就相当于将这个类交给Spring管理装配了!
自动装配注解
在Bean的自动装配已经讲过了,可以回顾!
作用域
@scope
- singleton:默认的,Spring会采用单例模式创建这个对象。关闭工厂 ,所有的对象都会销毁。
- prototype:多例模式。关闭工厂 ,所有的对象不会销毁。内部的垃圾回收机制会回收
@Controller("user")
@Scope("prototype")
public class User {
   @Value("秦疆")
   public String name;
}
小结
XML与注解比较
- XML可以适用任何场景 ,结构清晰,维护方便
- 注解不是自己提供的类使用不了,开发简单方便
xml与注解整合开发 :推荐最佳实践
- xml管理Bean
- 注解完成属性注入
- 使用过程中, 可以不用扫描,扫描是为了类上的注解
<context:annotation-config/>
作用:
进行注解驱动注册,从而使注解生效
用于激活那些已经在spring容器里注册过的bean上面的注解,也就是显示的向Spring注册
如果不扫描包,就需要手动配置bean
如果不加注解驱动,则注入的值为null!
基于Java类进行配置
JavaConfig 原来是 Spring 的一个子项目,它通过 Java 类的方式提供 Bean 的定义信息,在 Spring4 的版本, JavaConfig 已正式成为 Spring4 的核心功能 。
测试:
1、编写一个实体类,Dog
@Component  //将这个类标注为Spring的一个组件,放到容器中!
public class Dog {
   public String name = "dog";
}
2、新建一个config配置包,编写一个MyConfig配置类
@Configuration  //代表这是一个配置类
public class MyConfig {

   @Bean //通过方法注册一个bean,这里的返回值就Bean的类型,方法名就是bean的id!
   public Dog dog(){
       return new Dog();
  }

}
3、测试
@Test
public void test2(){
   ApplicationContext applicationContext =
           new AnnotationConfigApplicationContext(MyConfig.class);
   Dog dog = (Dog) applicationContext.getBean("dog");
   System.out.println(dog.name);
}
4、成功输出结果!
导入其他配置如何做呢?
1、我们再编写一个配置类!
@Configuration  //代表这是一个配置类
public class MyConfig2 {
}
2、在之前的配置类中我们来选择导入这个配置类
@Configuration
@Import(MyConfig2.class)  //导入合并其他配置类,类似于配置文件中的 inculde 标签
public class MyConfig {

   @Bean
   public Dog dog(){
       return new Dog();
  }

}
关于这种Java类的配置方式,我们在之后的SpringBoot 和 SpringCloud中还会大量看到,我们需要知道这些注解的作用即可!